Tranlating items v translating files
So we've all seen Navisworks and have appended models to create a composite model like so.

Click on all images if blurry for higher-res
All Images by Brad Hardin, barnhart-heery, inc.
But what a lot of folks might not know is that once you have created your composite model you can select either an entire file and translate it or you can select an individual component and translate it. Keep in min that we are working in an .NWF file format. I'll talk later on why .NWD file translation is wonky.
That said to translate an entire file, highlight on the Selection Tree and right click on the "File Units and Transform" command as shown below.
 This then pulls up the transform dialog box that allows you to enter in transformed coordinates and essentially move the entire file by entering in fett, inches or metric units depending on your system.
 While I don't recommend this tool to set up the alignment of your files, it is awfully handy when trying to relocate the entire elevation of say Fire sprinkler lines or a "what if" sturcture scenario, etc... Handy but usually our job as "BIM folk" is to change bits and pieces of a total design and make shifts here and there to reduce clashes and resolve design issues. Which takes us to transforming components....
Transforming components is not that complicated either. However ,I would recommend a process interjection here. If you haven't used the "measure" tool in Navisworks then I will introduce the newbies to it. If you are a seasoned vet and have this under control then I would recommend skipping ahead to the next paragraph that begins with "This image below..." (kind of like choose your own adventure).
To begin, if you want to move components in Navisworks, typically you need to know some measure of distance to enter as it isn't as easy to move components around as it is in Revit to measure the distance from one system to another to find out "clear space".
The image below shows a clash in between an electrical conduit sleeved slab penetration and a deck mounted utility light. In this case, I always look at moving the "LCD" - "least common denominator" which in this example is the lighting layout as the conduit sleeve needs to stack for all three floors of this design, instead of jog. So we're moving some lights. But how far Brad? How far are we moving those lights? Well I'm about to tell you.

Open the Measure tool from your dialog box, looks like this:

Then click on one end of the conduit sleeve (with snaps turned on...hit Help if you don't know how to do this) to the other end.
*Note - Keep in mind this is to find a ballpark measurement, if you want to get really exact in Navis, I recommend selecting your zoom tool and then right clicking on your view cube wheel and selecting orthographic instead of perspective and aligning your view to the dimension you need.
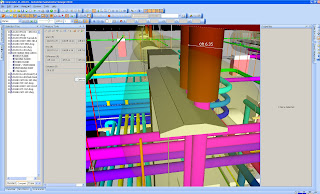
As you can see from the image below the sleeve is about 6.11" Which we will round up to 7", since there is no equipment to the left of the light and transform the light 7" to see if this clears our clash.
By highlighting the component, in this case the light, and right clicking, I will select the Override Item - > Override Transform. This will bring up a dialog box that looks like the image below. Here I will enter 7" in the Y direction that I wish to transform the object.
Click OK and "Voila!" now you can see that the light has shifted (not the entire file) and that we are visibly clear of the previous clash.

This type of quick review and alteration is a "Must Know" for the BIM Manager and one that comes in pretty handy when doing a live coordination meeting or doing some quick "what-if" scenarios among other things.
4 comments:
Great tip using the measure tool - why didn't I think of that
/Per
Your tutorial is very usefull but in your example you move the object along the Y axis... Now how can I set myself the Y direction along an existing object.... I haven't found any option to rotate or aling the Navisworks UCS !?!
Thank you ;o)
Great! Saved my life!rs
Bests.
Thank you man! saved my time and enthusiasm with Navis!! Bests!
Post a Comment