So I have been asked to do a couple of consulting gigs in the midst of oeprating a BIM division, writing a book and still finding time to do late night nacho runs @ 12:30p (please refer to fruitcake, champagne stains and bim for reference).
I had a great lunch yeterday with Harvey Phelps from Virtual Building Logistics. Harvey's a smart guy and a BIM guru as far as I'm concerned. Currently he's completing mutiple, huge international BIM consulting projects and still finding time to take lunch with fellow colleagues. We talked through some of the biggest issues not only about firm integration, but software that is currently being developed. Here's sort of my quick recap of thoughts on firm BIM integration that we have both experienced in one way or another:
1.) BIM doesn't work - people make it work. There is no way you can load BIM on to a machine plop anyone in front of the machine and hope that it will somehow make your life easier. In fact, it will make it harder for a while, let everyone know this.
2.) BIM is an investment. The easiest way I can explain this is almost like your 401k, "Will you realize the profits immediately?" Don't know...probably not. "Will you reaize your investment 6-8 months down the road when you find 188 clashes that equate to over 2.3 million in change orders?" closer. "Will you realize that investment when you can provide a greater service to your AEC team in improved communication and collaboration?" bingo.
3.) BIM will not tie your shoes. We use this phrase here in the office when someone thinks that BIM can solve every construction related problem there is. It's just not true. And let's be honest, BIM is still developing. There isn't a "one software works for everyone and will fix everything solution." I'm sorry NIBS, but IFC doesn't hold intelligent objects! Really it's good if you like blobs...it's my hope that the corss pollination of software gets better.
4.) Start small. A colleague of mine was recently tasked with integrating BIM into his large construction company. He gave me a ring and asked me what the best methodolgy was. He was thinking of training all 16 different satellite offices via web meetings. I told him he was crazy.
5.) Train yourself. make sure you know and learn and continue to learn as much as you can.
6.) Second, start a small intense training of a BIM team. These will be your disciples and you're backbone, when you get uber-busy. Believe me it happens.
7.) Third, multiply yourself. If you're trying to make BIM work in a large corporation with multiple locations, I have news for you, there is only one of you. So begin coordinating with management new hires or existing personnel who you have good rapport with and begin deciding and coordinating moves and location leaders at these other locations to train and maintain a BIM program, after your core department has been developed.
8.) Have a plan. Dedicate three weeks to do nothing but write out a plan that includes a schedule, key timelines and make it generous. Also include in the plan, facts, statistics and reasons why the company is implementing this new strategy. People will question it. And be prepared to be called nerd until you get it to make their day to day routine more efficient and then be prepared to be called buddy.
9.) Stick to the plan. Get management to review it and get the plan signed so that when you are tasked with training that everyone knows they need to be there, because it will be like herding cats.
10.) Learn more. Attend conventions, seminars and technology expos to learn about what's out there, if it could be helpful to your company and have a committee that reivews the new stuff and presents a software plan annually to the ownership.
Repeat...
Wednesday, February 13, 2008


Autodesk buys the world
As I'm sure it's relatively old news by now, Autodesk has now announced plans to purchase Green Building Studios. This cues in perfect for my friend Eddy Kriegel, his book 'Green BIM' and the 4x8 plexi glass 'Minority Report' style display Autodesk is using on all of their marketing and promotional materials for the upcoming LEED Desktop.
Anyways, I think in the end it's going to be an old fashioned showdown between Autodesk and Google with Adobe getting thrown into the mix...yeah I said it and don't think you haven't thought about it either! I'm actually in town today and tomorrow so I think I'll load up the ol' blog before I head out next week.
Anyways, I think in the end it's going to be an old fashioned showdown between Autodesk and Google with Adobe getting thrown into the mix...yeah I said it and don't think you haven't thought about it either! I'm actually in town today and tomorrow so I think I'll load up the ol' blog before I head out next week.
Wednesday, February 6, 2008
Old News...New News?
I was giving a brief tutorial to a couple of gents and ran across the ol' color scheme and they were beyond excited about this tool. And frankly, it's one I had kind of forgotten, so as a refresher...to make a color schema and plan.
First - Create a new floor plan - typically new and duplicate of an existing as you want to name this differently."Color Level 1, level 2 etc..."
Second - is go under the Room and Area tab to the bottom and select the Color Scheme Legend - then drag and drop this onto your new plan view.
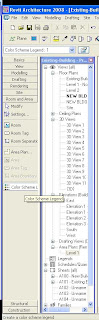
Third - is begin imputting the information into the Room Properties (department, finish, occupant, etc...) if you haven't created rooms yet you will need to in order for the Legend to populate.
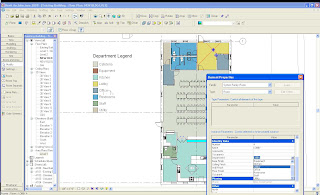
Lastly - You can edit the colors and scheme by clicking on the legend and then clicking Edit Color Scheme...
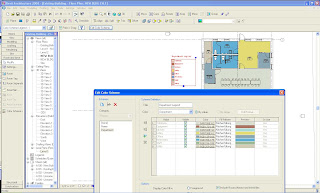
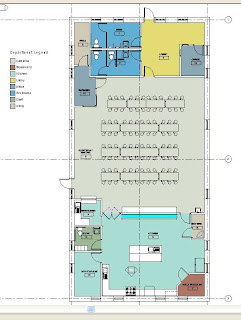
And in theory, you should end up with something that would otherwise take a while coloring up in photoshop or illustrator.
First - Create a new floor plan - typically new and duplicate of an existing as you want to name this differently."Color Level 1, level 2 etc..."
Second - is go under the Room and Area tab to the bottom and select the Color Scheme Legend - then drag and drop this onto your new plan view.
Third - is begin imputting the information into the Room Properties (department, finish, occupant, etc...) if you haven't created rooms yet you will need to in order for the Legend to populate.

Lastly - You can edit the colors and scheme by clicking on the legend and then clicking Edit Color Scheme...

And in theory, you should end up with something that would otherwise take a while coloring up in photoshop or illustrator.

Wednesday, January 30, 2008
New Resource + New Tutorial
Alright so today is a two-fer. First of all I wanted you all to be aware of a nice little publication I became aware of this week from Constructech that deals with nothing but IT, BIM and Construction specifically.
http://www.specialtypub.com/constructech/
Second thing, is some construction scheduling/sequencing and how it works with Innovaya (I'll do the NavisWorks tutorial at a later date).
For the most part if you are using Primavera products or Microsoft Project you are in the clear in regards to Innovaya. If you have some other proprietary scheduling software you might be in a pinch if it can't at least export to one of these programs. Hopefully I'll get the demo video up tomorrow so you all can take a gander at the interface and how the platform works.
Till then...
http://www.specialtypub.com/constructech/
Second thing, is some construction scheduling/sequencing and how it works with Innovaya (I'll do the NavisWorks tutorial at a later date).
For the most part if you are using Primavera products or Microsoft Project you are in the clear in regards to Innovaya. If you have some other proprietary scheduling software you might be in a pinch if it can't at least export to one of these programs. Hopefully I'll get the demo video up tomorrow so you all can take a gander at the interface and how the platform works.
Till then...
Friday, January 25, 2008
Collaborative Meeting
WOW! Thanks to everyone for coming out to the colaborative lunch! What a great crowd! I am going to follow up this little note with a video showing how Innovaya works as I demostrated, yesterday I think i'll just continue making archives of the information we go over each week and post it here.
Thanks again for coming out and what great emails!
Thanks again for coming out and what great emails!
Tuesday, January 22, 2008
Revit Cut and Fill Volume
Here's a nice little trick for finding Cut and Fill Volumes on a Site using Revit.
Revit Architecture can report cut and fill volumes on a site to aid in determining the costs of landscape modification during site development.
Revit Architecture reports the values by making a comparison between a surface from one phase and, from a later phase, another surface whose boundary lies within the earlier surface. For example, Revit Architecture can comparea toposurface created in Phase 1 and a toposurface created in Phase 2 that lies within the boundary of the surface from Phase 1.
When you select the later surface and click Properties, you see the following instance properties:
-> The Cut value is the volume removed (where the lower surface is lower than the earlier surface)
-> The Fill value is the volume added (where the later surface is higher than the earlier surface)
-> Net Cut/Fill value comes from subtracting the cut value from the fill value.
Revit Architecture can report cut and fill volumes on a site to aid in determining the costs of landscape modification during site development.
Revit Architecture reports the values by making a comparison between a surface from one phase and, from a later phase, another surface whose boundary lies within the earlier surface. For example, Revit Architecture can comparea toposurface created in Phase 1 and a toposurface created in Phase 2 that lies within the boundary of the surface from Phase 1.
When you select the later surface and click Properties, you see the following instance properties:
-> The Cut value is the volume removed (where the lower surface is lower than the earlier surface)
-> The Fill value is the volume added (where the later surface is higher than the earlier surface)
-> Net Cut/Fill value comes from subtracting the cut value from the fill value.
Monday, January 21, 2008
Brads Heads Up for the day
Don't know how many of you all are headed to the national AIA convention in May, but here's a great two day forum that they will be having discussing BIM and IPD which is where this ship is headed.
http://www.aia.org/ev_tap_may2008_conf
Should be pretty good. Longer blog tomorrow on how to manage keynotes linked to spec numbers and/or how to identify and estimate from Revit using Innovaya on a TI project we got going on. Depends on how much coffee I have...
http://www.aia.org/ev_tap_may2008_conf
Should be pretty good. Longer blog tomorrow on how to manage keynotes linked to spec numbers and/or how to identify and estimate from Revit using Innovaya on a TI project we got going on. Depends on how much coffee I have...
Subscribe to:
Posts (Atom)